| Contents |
Other Manual Pages |
|
|
|
|
|
|
The
Chart Settings Toolbars
|
Chart Levels Toolbar
[F2]
|
|
 |
|
Particular Chart Levels
can be quickly selected using these toggle buttons. They will
automatically toggle while SOB is being zoomed using any other
methods to indicate the current displayed Chart Level. (This will
always be the same as the chart level reported on the Status Bar -
see next section).
|
The
Levels equate to following scale ranges:
| Background
Levels |
Levels
for Navigating |
Virtual
Levels |
|
W
X
Y
Z |
26,400,000
13,200,000
8,800,000
6,600,000 |
A
B
C
D
E
F
G |
1,500,000
: 5,000,000
500,000 : 1,500,000
150,000 : 500,000
50,000 : 150,000
15,000 : 50,000
5,000 : 15,000
1,500 : 5,000 |
H
I
J |
500 :
1,500
150 : 500
50 : 150 |
|
| Chart
Toggles Toolbar [F3]
|

|
| Chart
panning/zooming controls |
| ChartLock |
only allows panning to an existing chart. Will move up levels (to less detailed) until the first with
data is found whenever the screen is panned into a “grey” area (ie: no coverage on current level).
NOTE: If you
experience display errors (mostly with PastTracks when navigating
near the edge of a detailed chart) then turn ON Chart Lock will
solve the display discrepancy.
|
| OverZoom |
will
allow over/under zooming of each chart level - should be
ON for most chart configurations and chart usage. |
| SkipEmptyLevels |
will display
only levels that exist when zooming - should also be ON for most
usage. |
| VirtualCharts |
will allow unlimited zooming – but to “course scale” charts at times (ie: heavily
over-zoomed), typically useful for accurate calculations and measurements. |
| MixLevels |
fills
in the regions beyond the detailed chart levels with chart data
from a less detailed level. This can be slow on weaker computers,
however aesthetically useful for drawing a complete chart and avoiding the “grey” areas
when there is no detailed coverage.
NOTE: charts of different creation scales will be
side-by-side, the larger scale chart will be less accurate and not
always line-up precisely with the more detailed chart.
|
| Chart
symbol display |
| Tides &
Currents |
show/hide
these symbols on the chart |
| Sea Bed |
display
abbreviated codes for type of Sea Bed (eg: Mud, Clay, Silt, Sand
etc)
Refer to a marine cartography reference book (eg: Bowditch), or
C-Map's Chart
Legend, for symbols used on nautical charts. |
| Depth Soundings |
show/hide
display of depth markers on contour lines, and inter-use with the
[F5] key to toggle display of Spot Soundings (where charted). |
| Bounding
Boxes |
show a
grey-outline around areas where more detailed charts are available.
See Quick Start Page -
Chart Levels |
| Graticule |
show/hide
the lines of Latitude and Longitude |
| Extra
chart options and feature toggles |
| Text
Labels |
Toggle
the display of all text labels on the chart. |
| Roads |
Toggle
display of Roads (where present in the cartography) |
| Animate
Lights |
Toggle
light animation mode. See SOB Manual - Networking Information |
| Land
& Sea Shading |
Show/hide
extended colour shading of the land elevations and water
depths.
See MAX
Page - New features |
| Perspective
View |
Toggle
Perspective View mode. See MAX
Page - Perspective View |

|
|
Navigating to a Destination (N2D)
see also Easy Tools

|
|
In N2D mode, a red "Destination"
Information Panel will show all
necessary data to help you navigate to
your destination - be it a Man-Over-Board
position; specific Waypoint; or
next Turn Point in the Active Route. |
|
SOB will automatically provide extra
information in a ViewPanel whenever a Navigate to
Destination scenario is active. There are
three such scenarios in SOB. In order of priority they are:
- Man-Over-Board
Enabled by pressing the MOB button.
- Navigate to Destination Waypoint
Any waypoint can be set as a destination, by pressing the
"Navigate to..." button on it's Waypoint
Form. Also, for a destination waypoint, an "Arrival Zone
Alarm" can be set. The arrival zone will appear on the chart as a
red "hashed" circle
around the destination waypoint.
- Next Turn Mark on an Active Route
If neither (1) nor (2) apply, AND a Route is currently marked as
active, then the "Navigate to..." panel will show details
pertaining to the next turning point on a Route if it is marked as active
(press the "Activate" button on the Route
Form).
The active route is displayed on the chart as thick red
lines, any passed TurnMark is drawn as a green
dot with the next TurnMark shown as a yellow
dot. The current leg and the Destination ViewPanel is
automatically updated as the turn marks are passed (either by sailing
within the arrival zone, or passing a "perpendicular" from
your course to the mark).
|
TTG & ETA on this Destination ViewPanel are
calculated based on VMG (Velocity Made Good).
VMG represents that component of your speed and heading which is actually
helping you get to the destination. If VMG is negative, then you are receding
from your destination (getting farther away).
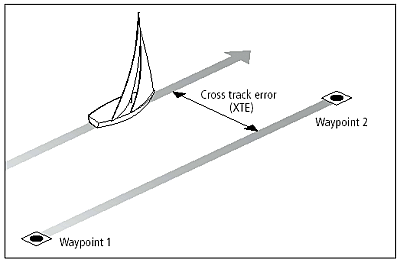
XTE is the
"Cross Track Error" value sent to the
AutoPilot when under remote control, and represents the
perpendicular distance away from the original course
line to the destination.
|
|
|
|
|
 Waypoints as Destinations
|
Waypoints nominated as a Destination create a "Navigate
to Destination" (N2D) scenario in SOB. Any N2D scenario (also a
Man-Over-Board, or Active Route) will display the red N2D ViewPanel, providing
constantly updated information to help you navigate to this location. The
Waypoint text on the chart surface will also supply basic navigation
information if enabled.
To make a Waypoint a destination, press the
[Navigate to Destination] button on the Waypoint
Form, the FIRST one found in the list, that is
set as a destination waypoint, will be the one used for on-screen navigation. If this
waypoint is consequently
un-set then the next one found in the list set as a destination will be used, etc.
The waypoint's status as a destination waypoint is reset once
its ArrivalZone has been breached, or the [Navigate to...] button is
reset.
NOTE: A Man-Over-Board is a regular Waypoint set as N2D.
Sequential Waypoints set as destinations can be
used as a simple route, as illustrated by the following examples ... |
 |
| Example
1 - A day's fishing |
|
Place Destination Waypoints sequentially along your intended course ...
A fisherman might place a series of 6 Waypoints at the following locations:
- crab pot 1
- abalone headland dive
- crab pot 2
- start trawling
- stop trawling
- back home
|
Set each as a destination waypoint, then once you reach each waypoint in turn, the "Arrived at ..."
message will be printed in the Messages ViewPanel, the next waypoint is
then used as the next
destination, allowing you to take appropriate action...
- stop the boat to retrieve the crab pot
- stop for the dive
- stop the boat to retrieve the other crab pot
- slow to 8 knots trawling speed
- fast as possible back home
-
prepare mooring/berthing gear
|
| Example
2 - Harbour entry/departure |
|
A sequence of rounding marks for
entering or departing a harbour or river mouth.
Two separate waypoint files
would be constructed: "harbour-in.wpt" and
"harbour-out.wpt".
First, consecutively create
waypoints for the IN file, then using the AllWaypoints form, save them to
their own file. Repeat using a different sequence and (probably) different
waypoints for the OUT file.
When creating the waypoints,
mark each as a destination (and optionally set the ArrivalZone alarm and
distance). Load and unload the appropriate waypoint file when entering or
leaving your harbour.
If the waypoints where created
in the correct order, the N2D panel will help to guide you to each one in
turn.
|
|
|
|
|
 Active Route
|

Click this ScreenShot
and use the window for full scale reference for the Active Route example
that follows.
|
To activate a Route, it must first be drawn on
the chart, or loaded from a file. (Refer to the QuickStart card for
instructions on drawing or loading a Route).
Select Route mode, then touch any TurnMark on the Route to
make active (the TM will be drawn as a solid red dot when selected). Now
touch the same TurnMark and select the [Route Details] button
from the quick menu.
An Active route will be drawn as a thick red line, with
the previous TurnMark drawn as large green dot, and the next as a yellow
dots. A TM is
considered as been passed, when either the ship has passed a perpendicular
to the mark (ie: the mark's bearing is now "aft of beam") and is
on a heading for the next; or when the ship has come within a certain
distance of the mark. |
Depress the [Activate] button on either the Route
Details form (pictured) or the AllRoutes form to begin the
"Navigate to Destination" scenario.
|

|
If
no other N2D scenarios are active, then Navigation Data will appear
in the red Destination ViewPanel (DestVP) for arrival
at the next TurnMark (TM) along the Route.
As a TurnMark's perpendicular is passed, or its nominated
ArrivalZone has been breached, then the DestVP will show data for
the following TM. |
 |
Summary Route data will be written to the
Navigation ViewPanel
|
|
|
 |
Complete up-to-date information about the
current Route is available from the Route Details form. (Touch a
Route TM twice then choose [Route Details] from the button menu).
The Green,
Yellow or Grey
indicators will match the drawing of the corresponding TurnMarks on the
chart display. Green TMs have been passed, the Yellow TM is the next ahead
(whose data is in the DestVP), and the Grey TMs are further ahead.
|
 |
If visible, the LegLabel is always
more detailed for the active leg. The TTG and ETA on the label are based
on an estimated speed pre-set (on the RouteDetails form) for that Route
leg.
|
 |
Set the LegLabels to 1 to also show the
names of the TurnMarks on the chart. Rename the TurnMarks on the
RouteDetails form by clicking on the name in the list. Type the new
name, then press [TAB] or click somewhere else on the form to refresh ...
avoid pressing [Enter] as this will close the form.
|
 |
Once a leg has been completed, the LegLabel
will display true time on leg and arrival time at the end of the leg.
|
|
|
|
|
|
|
|
Wind Tools
|
When an Apparent Wind sensor is connected (and it
sends NMEA
sentence: V W R - "Wind Angle and Speed"),
several helpful indicators can be drawn on the chart...
|
|

- Wind Vector Arrows: open the Ship's
Data Form (click the Ship's Target at any time) and check "Show
Wind Tools", then check your choice of Apparent and/or True Wind
Vectors.
The apparent Wind Vector is drawn as either a red
or green arrow, dependent on whether you
are sailing on port or starboard
tack. The apparent vector is read directly from the Wind Instrument, and
shows the relative wind direction as felt on the deck of the yacht (actually
- from the masthead, or where-ever the anemometer is fitted).
The True Wind is calculated based on the ship's "Speed Over
Ground" and "Course Over Ground" (SOG & COG as provided
by the GPS) and the apparent wind speed and direction supplied by the
Apparent Wind device. The true wind vector is displayed on the chart as a blue
arrow.
NOTE: The apparent wind vector is ALWAYS closer to the bow of the boat than
the true wind vector (when moving forward).
|
- Ship's Wind Shadow:
Ideally designed for optimum
upwind sailing, select (from the Ship's
Data Form) either or both "Show Shadow" and "Show
Laylines" and input your yacht's particular minimum angle that it can
sail to the wind.
The shadow thus displayed, represents the sector of the "Wind
Circle" that your yacht cannot sail. Sailing along the laylines, if the
Wind ½ Angle is set correctly, represents the closest point of sail that
your yacht can sail to the wind.
NOTE: On some displays, the Wind Shadow may (A) flicker annoyingly, or (B)
slow the computer down too much. If either of these situations occur -
uncheck the Wind Shadow box and utilise only the Wind Laylines.
- Waypoint Wind Shadow:
The Waypoint shadow is best
used when the Waypoint is positioned to represent your upwind destination, it
will help you sail optimally to this windward destination point. Once the Waypoint is
correctly placed, click the Waypoint with the Waypoint selector button
enabled to display this Waypoint Form. Now
check "Show Shadow" and/or "Show Laylines" and set the
½ Angle as described for the Ship's Wind Shadow. Generally speaking, the ½ Angle for the
Waypoint shadow should be the same as for the Ship's ½ Angle, however in
practice you may find that making the Waypoint angle slightly larger will ensure that you will clear the
windward mark.
NOTE: the laylines are drawn exactly to the ½ Angle, the shadow is drawn 2°
narrower than the ½ Angle.
The Waypoint shadow works slightly differently to the Ship's shadow. The
ship's shadow represents the sector where your yacht (under sail) CANNOT go,
the Waypoint shadow represents the region where your yacht SHOULD remain to
optimise your upwind leg (ie: sailing outside the Waypoint shadow means that
you will cover unnecessary ground whilst sailing upwind).
|
|
|
|
|
Auto Pilots
|
(typical
NMEA sentences used by SOB and AutoPilots are included in square brackets)
Refer to your AutoPilot manual to learn how to enable it for
remote data.
Refer to SOB Manual - Technical Information for
wiring schematics to connect the AutoPilot to your computer (and SOB)
One, or all of three, options may be available with the AutoPilot device:
- Steer to Course
- as supplied by an electronic compass or SOB [APA, APB, BOD, XTE]
- Steer to Apparent Wind
- select the Wind tickbox on the NMEA form to forward any wind
sentences to the AutoPilot. Note that SOB does not process any
autopilot/wind functions, but simply repeats the incoming wind commands to
the PC output for the pilot. [usually VWR]
- Steer to Destination Waypoint
- the destination waypoint information is sent via NMEA
[RMC, BWR, BWC] from SOB, or a GPS, or some other
NMEA devices
SOB will send any of the highlighted NMEA sentences if ticked on the
NMEA Raw Data Form.
NOTE: A Navigate to
Destination scenario must be active before SOB can send AutoPilot
commands (except the Wind commands).
The red Destination ViewPanel must be activated, by any of these
conditions:
- A Man-Over-Board scenario
- A Waypoint marked as a Destination
- An Activated Route
(SOB must be Registered or Licensed and Unlocked for AccessLevel=1 or higher to
enable the
autopilot commands on the Raw NMEA Data form)
|
|
|
|
|
Auto-Search Routes
|
Use the [Create AutoRoutes
...] button on the AllRoutes form
Select whether to draw a grid or
circular, and
choose the leg direction to determine the shape of the auto route.
As well as these four shapes, a further four configurations can
be
achieved by Reversing any of the auto routes after creating
them.
Once the auto-route is ready, it
can be used as is any
other route: Loaded, Unloaded, Activated, Analysed etc
If the Centre of the Search Area
is unknown, then estimate it using the set and drift calculator on
the form.

|
|
|
Raw NMEA
Data Form
|

Click an active area
of the form to jump to the relevant topic
|
| |
NMEA
Data Source
Shows the current source of the streaming data. The
options are: COM from a connected device through a
serial port (or "virtual" port from a USB
connected device); FILE when a NMEA data file is
being replayed; or WAN when connected to a remote
data source via the internet or LAN connection.
Some extra information to
aid in diagnosis is also displayed:
Sentences counts the total number of sentences received
by SOB.
Bytes read and Total bytes accumulate the
amount of received data.
A.I.S. Rx: counts the dedicated sentences received
from a connected AIS Receiver or Transponder.
Skipped: is a count of sentences that SOB did not
process. They are either NMEA sentences that SOB does not
recognise, or are incomplete or corrupted sentences that
SOB will not process. |
| |
Synch PC
If valid NMEA UTC data is being received, then use this
feature to synchronise the PC clock to UTC time from the
GPS. Your GMT offset as set in Control Panel will be
retained. |
| |
Ship
Data, Wind Data,
Misc, GPS
Route Data
These fields are continuously
updated with any incoming NMEA data. The data window will
show streaming data like in the example image. The values
extracted from the received sentences are shown in these
fields and used throughout SOB.
NOTE: A connected
Wind Anemometer will only send Apparent wind data.
The True wind values displayed here are calculated
by SOB using apparent wind and GPS course and speed over
ground.
|
| |
Next
Waypoint Data
When a connected GPS is set to "Goto" or
"Navigate" mode, it will transmit this data to
SOB. Cycling sequentially through the wpts as set in the
GPS.
Use the [Show GOTO
NMEA Wpt on Chart] to create a waypoint in SOB using
this information. If more than one wpt is being
transmitted, then you should temporarily close the data
source with [Close COMx] for a serial connection,
or [Pause] for a replay file, before capturing the
waypoint data, otherwise the captured wpt may have a
combination of data from different waypoints. |
| |
FIX:
Feet -> Metres
Some depth devices send incorrect data, notably DataLine
and VDO Logic devices. Use this tick box to apply a manual
correction if your displayed depth data is incorrect.
FIX:
AIS Latitude/Longitude
If you find that your AIS targets are incorrectly
displayed on the chart, then apply the appropriate FIX to
correct the incoming data. |
| |
LOG
Files
NMEA file replay controls. Any standard ASCII text logfile
containing NMEA sentences can be replayed in SOB. This
file can be saved from any NMEA source external to SOB, or
the SOB_NMEA_DATA.log file saved by SOB.
NOTE: Do not try
to replay the SOB_NMEA_DATA.log while SOB is
running or an error will occur. First quit SOB, then
rename the file before restarting SOB. The renamed file
can now be replayed. |
| |
NMEA
Output
Tick the box to enable NMEA data logging. All incoming
data will be logged to the file SOB_NMEA_DATA.log
and can be replayed at a future time. (see previous
point).
The RMC sentence can be ticked for output to the first
serial port for redisplaying navigation data on other
instruments, eg: RADAR, or other PC terminals.
The specific NMEA
sentences (APA, APB, BOD/XTE, BWR/BWC) can be selected for
output to control an Autopilot. Different makes/models of
autopilots work with different sentences. Consult your
autopilot manual, or experiment, to find the most
appropriate sentences for best control. Most newer
autopilots will be best with either the APA or APB
sentences. Wind output will relay any incoming
wind NMEA sentences directly to the output of the primary
COM port. Your autopilot must be capable of sailing to the
wind for this command to have any effect. Refer to your
autopilot manual for further details. NOTE: Only Registered
SOB versions with AccessLevel=1 or higher will have the
Wind, APA and APB commands enabled. |
| |
NMEA
Input
Ignore any received NMEA
data with no checksum, or a wrong checksum. The checksum
is added to the end of the NMEA sentence as an error
checking mechanism to ensure the integrity of the received
data, although not all NMEA instruments make use of the
checksum, and of those that do, some of them append an
incorrect checksum!
Generally, you don't need
to use the checksum, although if you discover some
inaccuracies with the received data, then enabling
checksum checking should prevent SOB from trying to
process corrupt data.
|
| |
Open
Serial Connection, (Next/Previous)
SOB can receive data on
two simultaneous COM ports. The configuration of these COM
ports is controlled by the external program SOB_COM.EXE
located in the \SOBvMAX\ folder.
Only the first COM port
in use is used for outputting commands for autopilot
control etc. The Open/Close and port selection buttons on
the form can be used to override the setting of this port
(except baud rate). This is useful for diagnosis purposes.
|
| |
WAN
Connect
Refer to SOB
User Manual - Networking Information
|
| |
Refresh
This button doesn't
really do anything as the form updates itself a couple of
times a second, or whenever new data is received. But
please press it if you want to...
|
|
|
|
|
|


