|

|
 Ship's Target
|
Press the Centre Ship
toolbar button or use the [space] key to redraw the chart display
with the Ship in the centre of the screen. |
|
|
|
 |
Auto Centre Ship’s
Target
Press the [Info]
button, followed by the [Centre Ship] button to "lock
down" the [centre ship] button.
This will put SOB into Auto Centring mode – and wont
allow the Ship to sail off the screen.
The display will automatically re-position the chart to keep the Ship's
Target visible at all times.
Disable Auto Centre mode by
pressing the [Centre Ship] button on its own.
|
|

|
The exact Ship's Position
on the
chart is indicated by the red-and-yellow "bullseye".
The large red arrow represents the Apparent Wind speed and
direction relative to the ship's direction, shown by the black arrow.
The blue arrow is the True Wind as calculated from the ship's
velocity and the apparent wind data*.
Customise the display of the wind
vectors, and the ship's symbol using the Setup Ship form. Display
the form by clicking the Ship's Target at any time, or using the [F9]
shortcut key.
Setup
Ship's Position Form

The Ship's Position is easily moved to any location:
1. centre the chart at the desired new location
2. display the Setup Ship's Position form (zoom-out
or use [F9] shortcut key if the target is not visible to
click)
3. press the [Set] button, then [Close] the form
Alternately, enter specific
co-ordinates in the Latitude and Longitude boxes, then press
[Set].
Note: you must enter Lat and
Long in DECIMAL-DEGREES, use the easy [Conversions] page to
find DD.dddd° from either DD°MM.mm'
or DD°MM'SS" formatted angles.
Ship's
Tools page
- Lubber Line is a
dotted line through the centre of the ship and extending
along the exact heading
- Course Line if a
N2D scenario is active, a dashed line is drawn from the
ship to the destination
- Range Rings
circling the ship are optionally displayed. Auto Size
will size the rings so the outer ring will fit within
the screen area. The range selected is displayed on the Ship's
Position Label
- Hollow Target the
Ship's Target is best against a white background - such
as C-MAP charts display along most navigable waters. At
times, the target displays more clearly when hollow,
with heavier rings drawn.
|
Ship's
Position page
- Dead Reckoning...refer
to Easy Tools
- Ship's Position Label
freezes its value until the next screen refresh. It can
be turned off or shown in different ways
- Ship's Vector can
be hidden or displayed in fixed or speed related sizes. The "Short" setting is best when
moving at speeds under 2 knots. The
"Super-size" will draw the target, vector,
pasttrack points and AIS targets greatly enlarged - this
is useful for viewing from the cockpit, or for large
screen sizes set at high resolutions (ie: bigger than
1024x768)
- Chart Orientation
rotates the chart according to your selection.
"Destination Up" will only be available if a
N2D scenario is active.
- Past Track can be
hidden by clearing the checkbox ... refer to Easy Tools
- Wind Tools
... refer to Advanced Tools
Custom
Settings page
Customise the display of
SOB's chart objects and personalise the display of speed,
distances, depths and coordinate units used.
Refer to MAX Additions
AIS
Static Data page
Refer to Power Users
|
|
|
|
|
|
 Zooming and Panning the
Chart
Zooming and Panning the
Chart
 |
An optical (no ball) cordless mouse
with a middle wheel is recommended to maximise SOB's ease of
use.
Panning and Zooming is
conveniently performed with the middle-wheel. Spin the
wheel for fast zooming (by changing chart level when possible);
and pan the chart by clicking with the middle-wheel. Also use the middle-button
to "drag" a resizing "zoom window" around an
area of interest. (see the example below) |
Pan by selecting a new
centre...
Move the chart freely and quickly
around the screen by clicking a point on the chart to centre the display
at that position. The StatusBar shows the Lat/Long at the mouse
position, that will become the new display centre.
To Pan vast distances, first zoom out a
few steps, then continuously click the appropriate side of the screen.
The new chart centre can be chosen by left-clicking
any place, providing no other click condition receives priority (ie:
left-clicking the Ship's target ALWAYS gives priority to showing the
Setup Ship's Position form). The middle-click always centres the
display at the point clicked on the chart, regardless of what ever tools
may be active (Route drawing, Waypoint tool ...).
 |
When the AutoPan toolbar
button is pressed, the chart will pan whenever the mouse pointer
moves to within about an inch (2.5cm) of any edge of the displayed
chart. To continue to pan the chart, the mouse pointer must be
moving.
Disable AutoPan mode by pressing the button again. |
Zoom with the Mouse-Wheel, the
Toolbar Buttons, or a Zoom-Window...
Use the buttons to step in or out of the chart
in steps that approximately halve or double the current displayed scale.
The zooming mechanism will avoid over zooming a chart and will instead
change to a more suitable chart level for the requested scale. The zoom
buttons will allow zooming to a very small scale, beyond any available
detailed levels, however the coastline will be very inaccurate in this
highly zoomed state. If the zooming mechanism ever feels
"locked-up" pressing the [0] (zero) button will reset
the zooming.
The mouse-wheel will generally not zoom the charts to a high
over-zoomed state. However if the chart has been zoomed in by other
means, the wheel zooming will follow these prior steps.
Zoom to a Window by dragging a rectangle shape,
from the top-left corner to the lower-right corner, surrounding the area
of interest. It is usually possible to zoom from a continental scale
overview, down to an individual harbour with two steps ...
|
Example using the
Middle-Mouse-Button and a Zoom Window.
From World Wide Overview Chart, to Sydney Harbour with two mouse
clicks! |

Chart Level Z
Scale: 5,000,000 : 1 |

Chart Level B
Scale: 600,000 : 1 |
|
Chart Level D Scale
100,000 : 1

|
|
|
|
|
 Quick Navigation Box Tool Quick Navigation Box Tool
|

|
When SOB first starts, there will be a red
line emanating from the Ship's Target. This is the Quick Nav Line which
defaults to position zero-zero or the Gulf of Guinea (so NW from Australian
locations). You can hide this line by using the [Declutter] button.
The NavBox displays brief navigation details from
your Ship to that point. The "Time To Go" is calculated based on
a straight line from your current Ship's Position to the marked point, at
your current SOG or BoatSpeed.
The NavBox can't be
hidden. This is a frequently used tool (once you get
used to it) and most of the time it will be in your display area, when you don't
want it cluttering the chart, zoom out or pan and move it out of the way.
|
|
Ship's Data Panel
| Ship's
Data ViewPanel display options |
|
The Ship's Data
ViewPanel displays important and immediate navigation data.
There are several different modes for this
panel, these are shown in the next table:
Use the [Size] button to toggle through three
different sizes for this panel, to make visibility of this data from the
cockpit, easier.
Hide/Show this panel using the ViewPanel
Display toolbar (see below).
NOTE: if some of the text is lost off the panel when resizing,
contact support@digiboat.com.au
for instructions on how to customise the "aspect ratio" of
this panel for your particular display
|
 |
GPS Navigation:
the box will be painted
black and represent data received via NMEA instruments (GPS and
DepthSounder).
Source:
direct Serial (COM) connected GPS and Depth |
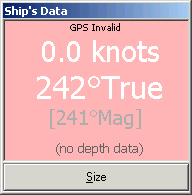 |
Source:
Primary connection doesn't have valid GPS data
|
| |
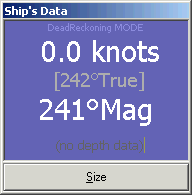 |
DeadReckoning Navigation:
will display a
pale-blue panel, and show course and speed as set in the "Setup
Ship's Position" form.
In DR mode, the Magnetic course value will be more prominent,
as DR navigating is typically performed by steering to a compass
course.
Source:
SOB DeadReckoning mode is set, overriding all other data sources
|
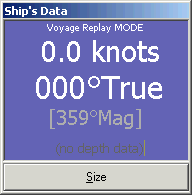 |
Voyage Replay Mode:
will also appear in a
pale-blue panel and repeat pre-recorded data when a log file is
being replayed
Source:
SOB logfile replay, overriding other connected data sources
|
| |
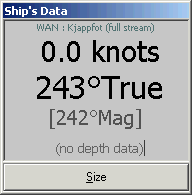 |
Source:
WAN Connected and set as Primary Ship
|
| |
|
|
 ViewPanels [V]
 |
Press this "paper-clip" button, or
the "V" key to show or hide the ViewPanels.
If ALL ViewPanels are closed manually (using their [Hide]
buttons),
If active, the "Navigate to Destination" red view panel can not be hidden with this button.
Notice that when a Man-Over-Board event is active in the Destination
ViewPanel, the [Hide] button is not available.
The ViewPanels:
- Messages: displays messages about ArrivalZones
alarms, AnchorZone alarm etc
- Targets: shows list of Targets as
they are acquired. Switch to [Detail] mode for information about a
specific target
- Anti-Grounding: shows list of
potential danger objects when in AG mode
- Destination: Navigation data when an N2D scenario
is active
- Navigation: Time, Wind, Routes and PastTrack
information
|

|
Messages ViewPanel
A variety of running messages are posted to this panel
automatically by SOB.
Some of these messages require no further interaction,
however some messages are ALARM conditions (and are signified with a
buzzing alarm sound) and require attention by the navigator or helmsman.
This panel can also be typed into by the operator to
make separate notes or "watch" information, etc. Existing text
in the panel can be manually deleted using regular text editing
techniques.
The text in this panel is periodically cleared and
logged to a file: \SOB\Logfiles\!messages.txt
This file is a plain text file which can be opened in Notepad.exe,
for review or printing etc...
|

|
Destination ViewPanel
This panel is automatically enabled whenever one of SOB's
"Navigate to Destination" (N2D) scenarios is activated.
N2D's in order of priority:
- Man-Over-Board
- Waypoint set as a Destination
- Activated Route
This panel supplies all the information required, at a
glance, to assist you with arriving at your destination.
If using the AutoPilot to steer your
boat, then a Navigate to Destination scenario must be active to
enable outputting of AutoPilot commands.
NOTES:
XTE is the Cross-Track Error required by the AutoPilot and
represents the perpendicular distance that you are displaced from your
original intended course to the destination mark.
See also Easy Tools - N2D
VMG is "Velocity Made Good" and represents that component of your speed
AND direction that is helping you get to the destination. If you are
steering away from the destination, then VMG will be negative.
|

|
Navigation ViewPanel
Select which extra information to display in the
Navigation ViewPanel with the tick-boxes on the Data Display menu.
Information relating to Time can be displayed in this panel:
Meridian time is based upon your current longitude (aka
"Ship's Time" based on Local Apparent Noon, or GHA). This time
zone is purely geographic and can be
different to your cultural Time Zone as established by National governing bodies.
Wind information is available if an Apparent
Wind Instrument (anemometer) is fitted to the boat and connected via
NMEA to SOB.
Route summary data is listed here, for detailed
Route data, refer to the Route Details form.
PastTrack summary detail is displayed if
selected on the "Setup Ship's Position" form.
Detailed
PastTrack information is continuously logged to:
\SOB\Logfiles\!pasttrack.txt and can be imported into Excel for
deeper analysis of the voyage.
|
|
|
|
 Waypoints
See also: Easy Tools
Waypoints in SOB are a
multi-purpose tool for placing a mark or event directly on the chart surface.
The waypoints can be grouped into separate files and loaded or unloaded in a
SOB session at any time.
Press the Waypoint Tool
button on the Main toolbar to enable Waypoint Mode.
-
Number of Waypoints
unlimited (limited only by available disk space/RAM)
-
Label size and position
changes dependent on icon size and label size
Label changes with [Declutter] button and AutoLoad choice
-
AnchorZone Alarm: enable by
depressing the [Alarm] button and NOT depressing the [Navigate to…]
button (on the Wpt Form)
-
TimeStamp arrival zone
entries in Msg and Log view panel
-
Waypoint Files will be saved
to the "\archived" folder
before being over-written
Create a new
Waypoint
Touch (left-click) on the chart
to place a mark at that position. A confirmation form will pop-up.
Set some basic features of the Waypoint and accept by pressing the [OK]
button, or press the [More...] button to open the Waypoints
form.
A Waypoint can be placed at the
current ship’s position by pressing the MOB button, then releasing the
button to end MOB mode – then rename and configure this Waypoint as desired
(wait until the Ship has moved off this position before you try to change the
Waypoint’s settings).
Change a
Waypoint
Touch an existing waypoint mark
to open the Waypoints form.
This form shows detailed Waypoint information and waypoint settings can be
changed.
Delete a
Waypoint
Click a Waypoint to display
the Waypoints form.
Press the [Delete] button on the form, then [OK] the warning box.
Hide a
Waypoint
Click a Waypoint to display
the Waypoints form.
Toggle the [Show/Hide] button. The waypoint will still be visible on the
chart, but only as a small dashed circle.
AllWaypoints
form
With the AllWaypoints
form, it is possible to:
-
Load/Unload and Manage SOB
Waypoint files. (".WPT")
-
Automatically import
".TXT" or ".CSV" files.
-
Capture Wpts sent from the
GPS to a .WPT file
-
Export a .WPT file to a .CSV
file
-
Upload/Download Waypoints to
the C-MAP User Card via
the USB Card Reader
-
Nominate individual or groups
of Waypoints to be automatically loaded when SOB starts
|
|
|
|
Introduction
to C-MAP Charts
SOB comes complete with 15
full detail Demonstration C-MAP Charts for your evaluation purposes. Use
these charts to trial both SOB and the C-MAP digital chart system for your
own needs. Specific charts for your area will have to be purchased from
C-MAP directly.
The C-MAP Charts are
available on CD-ROM or on the NT+ Cartridges.
Either of these charts, indeed both in combination, are suitable
for use in SOB.
|
|

|
C-MAP MAX Charts
New format charts from C-Map signifying a new standard in digital
cartography.
These charts are issued in the same way as the NT+/PC charts
(below). |
|

|
C-MAP
NT+/PC Charts (CD-ROM version)
The CDs containing all the World's C-MAP charts are given away
freely by C-MAP (registered SOB users had the option of having
these disks posted to them at the time of registering, otherwise
they can be ordered direct from C-MAP at any time).
Specific charts on the CDs must be selected and licensed prior to
use. A simple program PC
Chart Selector is included on the C-MAP CDs to allow easy chart
selection and immediate on-line or call-centre ordering. C-MAP
will only supply you with a Licence Code which will unlock the
purchased chart allowing SOB full access to it. |
 |
NT+ &
MAX C-MAP
Cartridges
Commonly used in chart-plotters from a variety of
manufacturers, these cartridges can also be used by SOB on your
computer. An accessory, supplied by C-MAP, is the USB
C-CARD Reader which connects to your computer via a USB
port, and will permit use of any NT+ and/or MAX C-MAP Cartridge within SOB.
The Card Reader can take two C-MAP
cards at one time, and further chart cards can be
"hot-swapped" without the need to close or re-start SOB. |
Chart
Areas and Chart Levels
Areas
C-MAP
Charts are purchased as groups (or folios) of charts of a variety
of different scale ranges to cover a particular area or region.
The PC
Chart
Selector program included on the CD-ROMs is the easiest way to identify
and/or purchase chart regions.
C-MAP areas, or
regions, are denoted by: Wide, Wide+ (plus), Superwide and
Superwide+.
A Superwide+ region would typically cover an entire side of a
National coastline (eg: US East Coast, Australia East Coast, New
Zealand North Island) and contain hundreds of equivalent paper
charts in all scale ranges for all charted areas within the
region.
 |
 |
All chart areas and
chart levels that are available for SOB to use, will
be totalled and summarised in the About SOB
form. |
In the example image: C-MAP
charts installed equals 19, (and is comprised of all
possible C-MAP chart types that SOB can use):
| WorldWide
background chart |
1 |
| Demo
C-MAP Charts |
15 |
| NT+/PC
Licenced Charts |
2 |
| NT+
Cartridge chart (with USB Reader) |
1 |
| Total
Installed C-MAP Charts |
19 |
Use the [C-MAP] button on
the About SOB form to get a detailed listing of
installed C-MAP charts. (view sample
form)
|
Levels
C-MAP Charts are built of different Levels (A-G
and W-Z) each level is a different scale range. Levels A-D for
coastal navigating and E-G for harbour-level chart detail. (more
information, see Table
of Level Scales)
SOB will always be installed with
two World Wide background level charts, C-MAP Level W and Level
Z. If other detail chart levels are available they will appear
as grey bounding boxes (as shown around Seattle, Hawaii,
Florida, Panama in the image below).
Levels-within-levels will also be shown as bounding boxes when
zooming in and out through the levels. (more about levels: StatusBar,
ChartLevels Toolbar)
|
|

|
|
|
Abbreviations &
Acronyms
|
ETA |
Estimated Time of Arrival |
|
kn |
Knots (Nautical Miles per Hour) |
| TTG |
Time To Go |
|
UTC,GMT |
Universal Co-ordinated Time, Greenwich Mean Time |
| XTE |
Cross Track Error |
|
VMG |
Velocity Made Good |
| RBL |
Range and Bearing Line |
|
SOG |
Speed Over Ground |
| RTE |
Route |
|
COG |
Course Over Ground |
| WPT |
Waypoint |
|
SPD |
Speed |
| LAT |
Latitude |
|
HDG |
Heading |
| LNG |
Longitude |
|
RNG |
Range |
| Nm |
Nautical Mile |
|
BRG |
Bearing |
| ºT, ºM |
Degrees True, Degrees Magnetic |
|
DTS |
Direction To Steer |
| ºC, ºF |
Degrees Celsius, Degrees Fahrenheit |
|
TZ |
Time Zone |
| NMEA |
National Marine Electronics Association |
|
MOB |
Man Over Board |
| DR |
Dead Reckoning |
|
LKP |
Last Known Position |
| MagVar |
Magnetic Variation |
|
C-MAP |
Short company name (for C-MAP Electronic Charts) supply
the charts that SOB displays. |
| GC |
Great Circle |
|
N2D |
Navigate-To-Destination |
| RL |
Rhumb Line (loxodrome) |
|
|
|
|
|
Quick Glossary
(see also Full Glossary)
| Dead Reckoning |
A method of
navigating using an estimation of your current position, course
and speed. DR is typically used when (1) the GPS is unavailable,
or (2) to simulate a passage when away from the boat. |
Boat Speed,
SOG
|
Boat Speed is the
speed through the water as measured by manual means or with an
onboard LOG. Speed-Over-Ground is your speed relative
to the Earth's surface, as measured by a GPS. |
| Compass Heading, COG |
Compass Heading is
your course as measured by an onboard magnetic or electronic
compass.
Course-Over-Ground is the true heading measured by a GPS. |
| Great Circle, Rhumb Line |
Rhumb Line is a
straight line course on a Mercator chart (C-MAP charts in SOB use
the Mercator Projection). RLs follow a constant magnetic heading,
and mathematically are known as a "loxodromic" curve.
Great Circle courses represent the shortest distance between two
geographic locations, but require a continuous change in the
ship's heading. |
| PastTrack |
The
"tail" behind the moving ship that indicates the exact
path taken by the ship.
Show/Hide the PastTrack on the Ship's Settings Form.
Further analyse the PastTrack by importing "SOB\Logfiles\!PastTrack.txt"
into Excel. |
| Ship's Target |
SOB's indicator
showing the current ship's location.
Display of the Ship's Target can be customised with the Ship's
Settings Form. |
|
|
|

